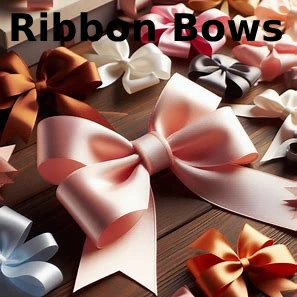
Making a bow out of ribbon is a fun, easy, and creative way to add a special touch to many projects. Whether you are decorating gifts, creating hair accessories, or enhancing party decorations, ribbon bows are versatile and add an elegant flair. Learning how to make a bow out of ribbon is a simple skill that everyone should know, and it’s an easy way to personalize gifts or crafts.
Materials You Will Need
Before we dive into the step-by-step process of making your ribbon bow, it’s essential to gather the right materials. Here’s a list of what you’ll need:
Materials:
- Ribbon: Choose a ribbon that fits the project. For a simple bow, satin or grosgrain ribbons work well. You can select ribbons of different widths, depending on the size of the bow you want.
- Scissors: Sharp scissors are crucial for clean edges.
- Glue or Needle and Thread: You’ll need something to hold the bow together. Hot glue works well for most projects, but a needle and thread are perfect for added durability.
- Floral Wire (Optional): This is useful if you’re creating a larger bow and need more structure.
Once you’ve gathered these items, you’re ready to start making your bow!
How to Make a Bow Out of Ribbon: A Step-by-Step Guide
Step 1: Choose Your Ribbon
Start by selecting the ribbon you want to work with. You can pick any color, pattern, or material that suits your project. Satin, grosgrain, or organza ribbons are popular choices for making bows.
Step 2: Cut the Ribbon
Cut a piece of ribbon. The length depends on the size of the bow you want to make. For a simple bow, cut a piece around 12-14 inches long. You can adjust the length later if you want a larger or smaller bow.

Step 3: Form the Loops
- Create a loop by folding the ribbon in half. Hold the ribbon in the middle, forming two equal parts.
- Twist the ribbon: Cross the left side over the right side to form the first loop. Then, bring the right side over the left side to create the second loop. You now have the basic shape of the bow.
Step 4: Secure the Center
- Pinch the center of the loops together to create the bow shape. You can hold it with your fingers or use a piece of floral wire to secure it tightly. If you’re using glue, apply a small amount to the center and press it together.
Step 5: Add the Tail
To give your bow a finished look, cut a small piece of ribbon (about 4-6 inches) and attach it to the bottom of the bow. Fold it into a “V” shape to create the bow’s tails.
Step 6: Finish the Bow
Once the ribbon is secured, adjust the loops and tails to your liking. You can also cut the ends of the ribbon at an angle or in a “V” shape to prevent fraying and to add a decorative touch.
Types of Ribbon Bows
There are several types of ribbon bows you can make, depending on the occasion and purpose. Here are some popular styles:
1. Simple Bow
This is the most basic bow, made by folding the ribbon into two loops and securing them in the center. It’s perfect for wrapping gifts, decorating hair clips, or attaching to gift bags.
2. Double Loop Bow
For a more intricate look, create a double-loop bow. This involves making two sets of loops and securing them in the middle. Double-loop bows are perfect for larger projects like wreaths or decorations.
3. Bow with Tails
If you want to make your bow look even more elegant, add tails. Cut the ends of your ribbon into long strips that hang down from the center of the bow.
4. Layered Bow
Layered bows are made by stacking smaller bows on top of one another. This style is popular for large decorations or hair accessories.
Common Mistakes and How to Avoid Them
Making a ribbon bow might seem simple, but there are a few common mistakes that can happen. Here’s how to avoid them:
1. Uneven Loops
One of the most common mistakes is creating loops that are uneven in size. To avoid this, make sure you measure and fold the ribbon carefully. If you’re not sure, use a ruler to ensure both sides are equal.
If you wanted to read more about fashion, visit our website’s Fashion Section.
2. Untidy Ends
Ribbon ends that aren’t properly cut can look messy. Always trim the ends at a diagonal or in a “V” shape to give your bow a clean finish.
3. Bow Too Loose
If your bow doesn’t hold its shape, make sure the center is tightly pinched or securely glued. Using floral wire can also help keep the bow in place.
Creative Ideas for Ribbon Bows
1. Gift Wrapping
Use your handmade ribbon bow to top off a beautifully wrapped gift. It adds a personal and creative touch to any present.
2. Hair Accessories
You can create a cute hair bow by attaching a small ribbon bow to a hair clip or headband.
3. Home Decor
Ribbon bows can be used for DIY projects around the house, such as adorning wreaths, curtains, or holiday decorations.
FAQs: How to Make a Bow Out of Ribbon
Q1: How do I make a bow out of ribbon without glue?
If you prefer not to use glue, you can use needle and thread to secure the bow. Simply sew through the center of the bow after pinching it together to hold the loops in place.
Q2: What is the best type of ribbon for making bows?
Satin and grosgrain ribbons are the most commonly used because they hold their shape well. However, you can also use organza or velvet ribbons for a more luxurious look.
Q3: How do I prevent my ribbon bow from fraying?
To prevent fraying, cut the ribbon ends at an angle or apply a small amount of fabric sealant or fray check to the edges.
Final Words
Making a bow out of ribbon is a fun and easy craft that can elevate your projects with just a few simple materials. Whether you’re decorating a gift, creating a hair accessory, or adding a special touch to your home decor, a ribbon bow is a versatile and beautiful option. With these easy-to-follow steps, you’ll be able to create perfect bows in no time! Remember to practice and experiment with different ribbon styles to find your favorite. Happy crafting!

